Aquí se encuentra la lección 4, en inglés.
Se creará un friso sin uniones para utilizar como borde deslizante superior.
Elementos necesarios:
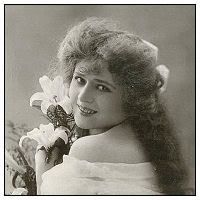
1) imagen según modelo:

espejada, con borde superior e inferior, en la que se deberá disimular la unión. Alto: 250-300 pixeles. Ancho: 300-400.
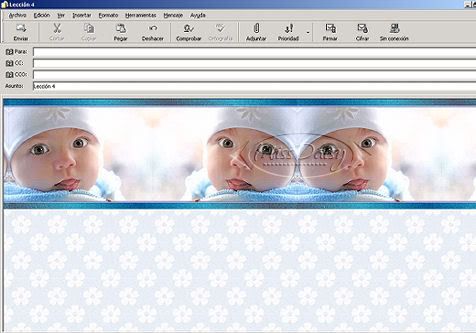
2) una trama con algún efecto de textura o con un patrón, haciendo juego con la imagen. Este es el mío:
 3) música. 3) música. Guardar el archivo (lo descargas del enlace) en: C - Archivos de programa - Archivos comunes - Microsoft Shared - Stationery. Seguir las indicaciones y pautas que se han dado para la lección 1. - - - Este es el código la presente lección donde se marcará en rojo lo que hay que cambiar y en verde van las aclaraciones.
HTML
HEAD
STYLE
body {font-family: "Comic Sans MS" FUENTE ;font-size: 14pt TAMAÑO DE LA LETRA ;margin-left:30 DISTANCIA EN PIXELES ENTRE EL MARGEN IZQUIERDO Y EL COMIENZO DE LA ESCRITURA, SI NO TE GUSTA PUEDES MODIFICARLO; margin-right:0; background-color: #ffffff; color: #ffffff COLOR DE LA LETRA, PONER DE ACUERDO AL FONDO PARA QUE SEA LEGIBLE}
/STYLE
/HEAD
!-- An optional background image can be used but it will not scroll --
BODY background = "C: \ Program Files \ Common Files \ Microsoft Shared \ Stationery \ lesson4bkg.jpg" AQUI VA LA TRAMA PEQUEÑA CON EL PATRON O TEXTURA. BORRA TODA LA RUTA DE CARPETAS Y DEJA ENTRE COMILLAS SOLAMENTE EL NOMBRE DEL ARCHIVO Y EXTENSION (.jpg)
Sample text.
!-- THIS IS THE TOP BORDER IMAGE - YOU MUST ENTER THE HEIGHT AND WIDTH --
IMG id=bkg src="C: \ Program Files \ Common Files \ Microsoft Shared \ Stationery \ lesson4.jpg" AQUI VA TU IMAGEN O FRISO. BORRA TODA LA RUTA DE CARPETAS Y DEJA ENTRE COMILLAS SOLAMENTE EL NOMBRE DEL ARCHIVO Y EXTENSION (.jpg) style=" position: absolute; left:-1800; height:275 (PONER EN PIXELES LA ALTURA DE LA IMAGEN); width:269" (PONER EN PIXELES EL ANCHO DE TU IMAGEN)
BGSOUND src = "C: \ Program Files \ Common Files \ Microsoft Shared \ Stationery \ lesson4. mid" (AQUI VA LA MUSICA. BORRA TODA LA RUTA DE CARPETAS Y DEJA ENTRE COMILLAS SOLAMENTE EL NOMBRE DEL ARCHIVO Y EXTENSION (.mid) loop=99 style="display:none"
SCRIPT language=VBScript
REM Edgar V. Poirier
REM moomoo@nbnet.nb.ca
REM Thanks to Tar'Hom for the idea ; )
REM Revised May 20, 1999
Dim w, wW, wH, sH, wx, pW, pH, myTimer, x, xD, Res, calcFlag
Dim picX, picY, bxW, bxH, numPics
Set w=document.body
REM ************* MAKE CHANGES HERE *************
xD=1
REM *********************************************
REM Initialize
sub setUp()
On Error Resume Next
REM Get window dimensions
wW=w.clientWidth
wH=w.offsetHeight
sH=w.scrollHeight
bH=wH
if sHwH then bH=sH
REM Set margins
w.style.marginTop=pH
REM Limit visible area
container.style.width=wW
container.style.top=0
container.style.left=0
REM Set the size of the scrolling area
box.style.height=pH
box.style.left=-(pW)
box.style.top=0
if calcFlag=1 then
calcFlag=0
setUp
end if
REM Start the scroll.
SF
end sub
REM universal scrolling routine.
sub SF()
ClearTimeOut(myTimer)
x=x+xD
if xD0 and x=0 then x=-(pW)
if xD0 and x-(pW) then x=0
REM Position the background image.
box.style.left = x
REM repeat (larger numbers give slower scroll below)
myTimer=SetTimeOut("SF",24)
end sub
REM Everything starts here
sub Window_OnLoad()
REM Get window dimensions
wW=w.clientWidth
wH=w.offsetHeight
REM Get users screen resolution
wx=window.screen.width
REM and adjust font size to match.
Res=INT(wx/128)
w. style. font Size = 14 + Res (HACER COINCIDIR CON EL TAMAÑO DE LA LETRA PUESTO ANTES)
REM Set flag to force one extra calculation
calcFlag=1
x=-(pW)
REM Get dimensions of background image.
pW=bkg.style.posWidth
pH=bkg.style.posHeight
REM Number of images across
numPics=INT((wx)/pW)+2
REM "Tile" the background (NOTE: Image is not positioned.)
for j=1 to numPics
data=""
data="IMG src='" & document.all("bkg"&i).src & "'"
box.insertAdjacentHTML "beforeEnd", data
next
REM Lets get started.
setUp
end sub
REM This runs if the window size is changed.
sub Window_OnResize()
setUp
end sub
/SCRIPT
!-- This is the top border made up of a SPAN inside a DIV - DO NOT CHANGE OR MOVE THE FOLLOWING --
DIV id=container style="position:absolute; top:0; left:-1400; width:800; height:600; z-index:-1; filter: BlendTrans (Duration=0)"
SPAN id=box style="HEIGHT: 4000px; POSITION: absolute; WIDTH: 3000px"/SPAN
/DIV
/BODY/HTML
- - -
Eso es todo. Pestaña Vista previa, verificar que todo luzca bien. Pestaña Modificar, escribir tu texto. Destinatario, Asunto.
Formato - Fondo - Sonido, buscar la música en tu pc y agregar.
Ya puedes enviar.
Etiquetas: Tutoriales HTML |