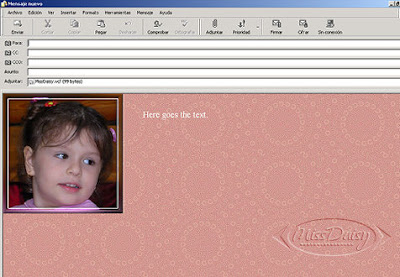
Aquí se encuentra la lección 6 en inglés. Se trata de un slide show o exposición de diapositivas.
Necesitaremos:
- 4 imágenes del mismo tamaño, aprox. 300 pixeles (Utilicé cuatro fotografias de la misma niña)
- un fondo y
- música.
Todo tiene que estar en la carpeta Stationery.
Guardar el archivo (lo descargas del enlace) en: C - Archivos de programa - Archivos comunes - Microsoft Shared - Stationery.
Seguir las indicaciones y pautas que se han dado para la lección 1.
- - -
Aquí está el código con las indicaciones para realizar los cambios:
HTML
HEAD
STYLE TYPE="text/css"
!--
body {
font-family: "Comic Sans MS"; tipografía
font-size: 14pt; tamaño de la tipografía
margin-left: 350; margen izquierdo, al ancho de la fotografía o imagen hay que sumarle unos 10 pixeles, para que el texto no quede pegado.
margin-right: 10; margen derecho
background-color: #000000; color del fondo
color: #ffffff; color de la letra
}
--
/STYLE
/HEAD
BODY
BODY bgColor= #dad5ce aquí he puesto el mismo color que en el fondo background="C : \ program files \ common files \ microsoft shared \ stationery\ lesson6bk g.jpg" borrar toda la ruta y colocar entre comillas el nombre del archivo para el fondo y la extensión ej.: "fondo6.jpg"
Sample text.
p /p
!--
The DIV below holds the images that will will be shown in the slide-show.
Width and height should equal the largest Image dimensions.
--
DIV id=box style="POSITION: absolute; TOP: 0; LEFT: 0; WIDTH: 250; HEIGHT: 230" las medidas de las imágenes que para todas es la misma width es ancho y height alto, va en pixeles.
!--
This slideshow is much better when all the graphics are the same size.
Also, the graphics for the slide show should be numbered sequentially as shown from pic1 to pic#.
--
IMG id=pic1 src="file : // C: \ Program files \ common files \ microsoft shared \ stationery \ pic1here.gif" style="POSITION: absolute; TOP: 0; LEFT: 0; VISIBILITY: hidden"
IMG id=pic2 src="file : // C: \ Program files \ common files \ microsoft shared \ stationery \ pic2here.gif" style="POSITION: absolute; TOP: 0; LEFT: 0; VISIBILITY: hidden"
IMG id=pic3 src="file : // C: \ Program files \ common files \ microsoft shared \ stationery \ pic3here.gif" style="POSITION: absolute; TOP: 0; LEFT: 0; VISIBILITY: hidden"
IMG id=pic4 src="file : // C: \ Program files \ common files \ microsoft shared \ stationery \ pic4here.gif" style="POSITION: absolute; TOP: 0; LEFT: 0; VISIBILITY: hidden"
/DIV
son cuatro renglones, cuatro imágenes, deben quitar en cada uno toda la ruta y entre comillas colocar el nombre y extensión de cada imagen ej.: "foto1.jpg"
BGSOUND id=music src="file : // C: \ Program files \ common files \ microsoft shared \ stationery \ midinamehere.mid" loop=99
style="display: none"
aquí va la música, borrar toda la ruta y dejar solamente el nombre y extensión de tu archivo de música entre comillas, ej: "nocturno.mid"
SCRIPT language="VBScript"
REM Edgar V. Poirier
REM moomoo@nbnet.nb.ca
Dim w, p1, p2, nw, od, numPic, myTimer, tFlag, count, filterDuration, filterType
Set w=document.all
REM Initialize
sub setUp()
REM Enter the total number of images in the next line
numPic=4
REM Enter number of times to cycle images below
count=4
REM Transition filter type selection below.
REM Enter 1 for Blend transition
REM Enter 2 for Reveal Transition
filterType=1
if filterType=1 then box.style.filter="BlendTrans (Duration=2)"
if filterType=2 then box.style.filter="RevealTrans (Duration=2, Transition=3)"
REM Transition duration in seconds
filterDuration="3"
box.filters(0).Duration=filterDuration
nw=1
od=0
REM Transition flag - in case it is needed.
tFlag=0
REM Initially display first image
pic1.style.visibility="visible"
REM Do the transition after delay
myTimer=SetTimeOut("doIt",filterDuration*1000)
end sub
REM Do transition
sub doIt()
ClearTimeOut(myTimer)
REM Set for next images
nw=nw+1
REM Make sure image number is valid
if nwnumPic then
nw=1
count=count-1
end if
od=od+1
if odnumPic then od=1
REM Do the transition here
if tFlag=0 and count0 then
REM Set transition flag to signify transition in progress.
tFlag=3
REM Select Images according to count
REM Previous Image
Set p1=w("pic"&od)
REM Next image
Set p2=w("pic"&nw)
REM Prepare filter
box.filters(0).Apply()
REM Hide previous Image
p1.style.visibility="hidden"
REM Display next Image
p2.style.visibility="visible"
REM Play filter
box.filters(0).Play()
else
if count=0 then
REM Hide the last image
Set p1=w("pic"&od)
box.filters(0).Apply()
p1.style.visibility="hidden"
box.filters(0).Play()
REM Stop everything
exit sub
end if
end if
end sub
REM This subroutine runs when transition has finished.
sub box_OnFilterChange()
REM Transition completed so clear the flag.
tFlag=0
REM Wait a few seconds before next transition
myTimer=SetTimeOut("doIt",filterDuration*1000)
end sub
REM Keeps slide-show window on screen if text scrolls
sub window_OnScroll()
box.style.top=document.body.scrollTop
end sub
REM Everything starts here
sub Window_OnLoad()
On Error Resume Next
REM Get users screen resolution
wx=window.screen.width
REM and adjust font size to match.
Res=INT(wx/128)
document.body.style.fontSize = 14+Res
setUp
end sub
/SCRIPT
/BODY
/HTML
- - -
Verificar en Vista previa. Volver a Modificar. Colocar "Aquí va el texto". Insertar la música desde Formato - Fondo. Achivo - Guardar como - Guardar el fondo en tu carpeta especial de stationeries, como archivo.eml
Volver a abrirlo desde allí y en vista Modificar, hacer doble clic sobre "Aquí va el texto" y escribir encima tu mensaje. Completar los datos del destinatario y asunto. Enviar.
El otro archivo guardado queda limpio para usar cuantas veces desees.Etiquetas: Tutoriales HTML |

